IREPS Vendor Registration: Fees, Documents & Step-by-Step Guide (2026)
Complete IREPS vendor registration guide with current fees, required documents, and eligibility criteria for Indian Railway e-procurement bidding.
IREPS Vendor Registration: Steps, Fees, Eligibility, Links
If you're an infrastructure or construction firm looking to bid on Indian Railways contracts, IREPS vendor registration is the mandatory first step. The Indian Railways E-Procurement System (IREPS) handles all procurement for one of the world's largest railway networks, from track materials and signaling equipment to civil works and consulting services. Without an active vendor profile on this portal, you simply cannot participate in any of these tenders.
The registration process itself isn't complicated, but it does involve specific documentation, eligibility criteria, and fee payments that trip up first-timers. Missing a single requirement can delay your approval and cost you active bidding opportunities. This guide walks you through every step of the process, from creating your account to getting your profile verified, along with the exact fees, documents, and eligibility conditions you need to know upfront.
At Arched, we monitor IREPS alongside 500+ other government procurement portals to surface railway tenders that actually match your firm's credentials and past project experience. But before our platform can help you identify and win those contracts, you need to be registered. So let's get that sorted, here's everything you need to complete your IREPS vendor registration without unnecessary back-and-forth.
What you need before you start
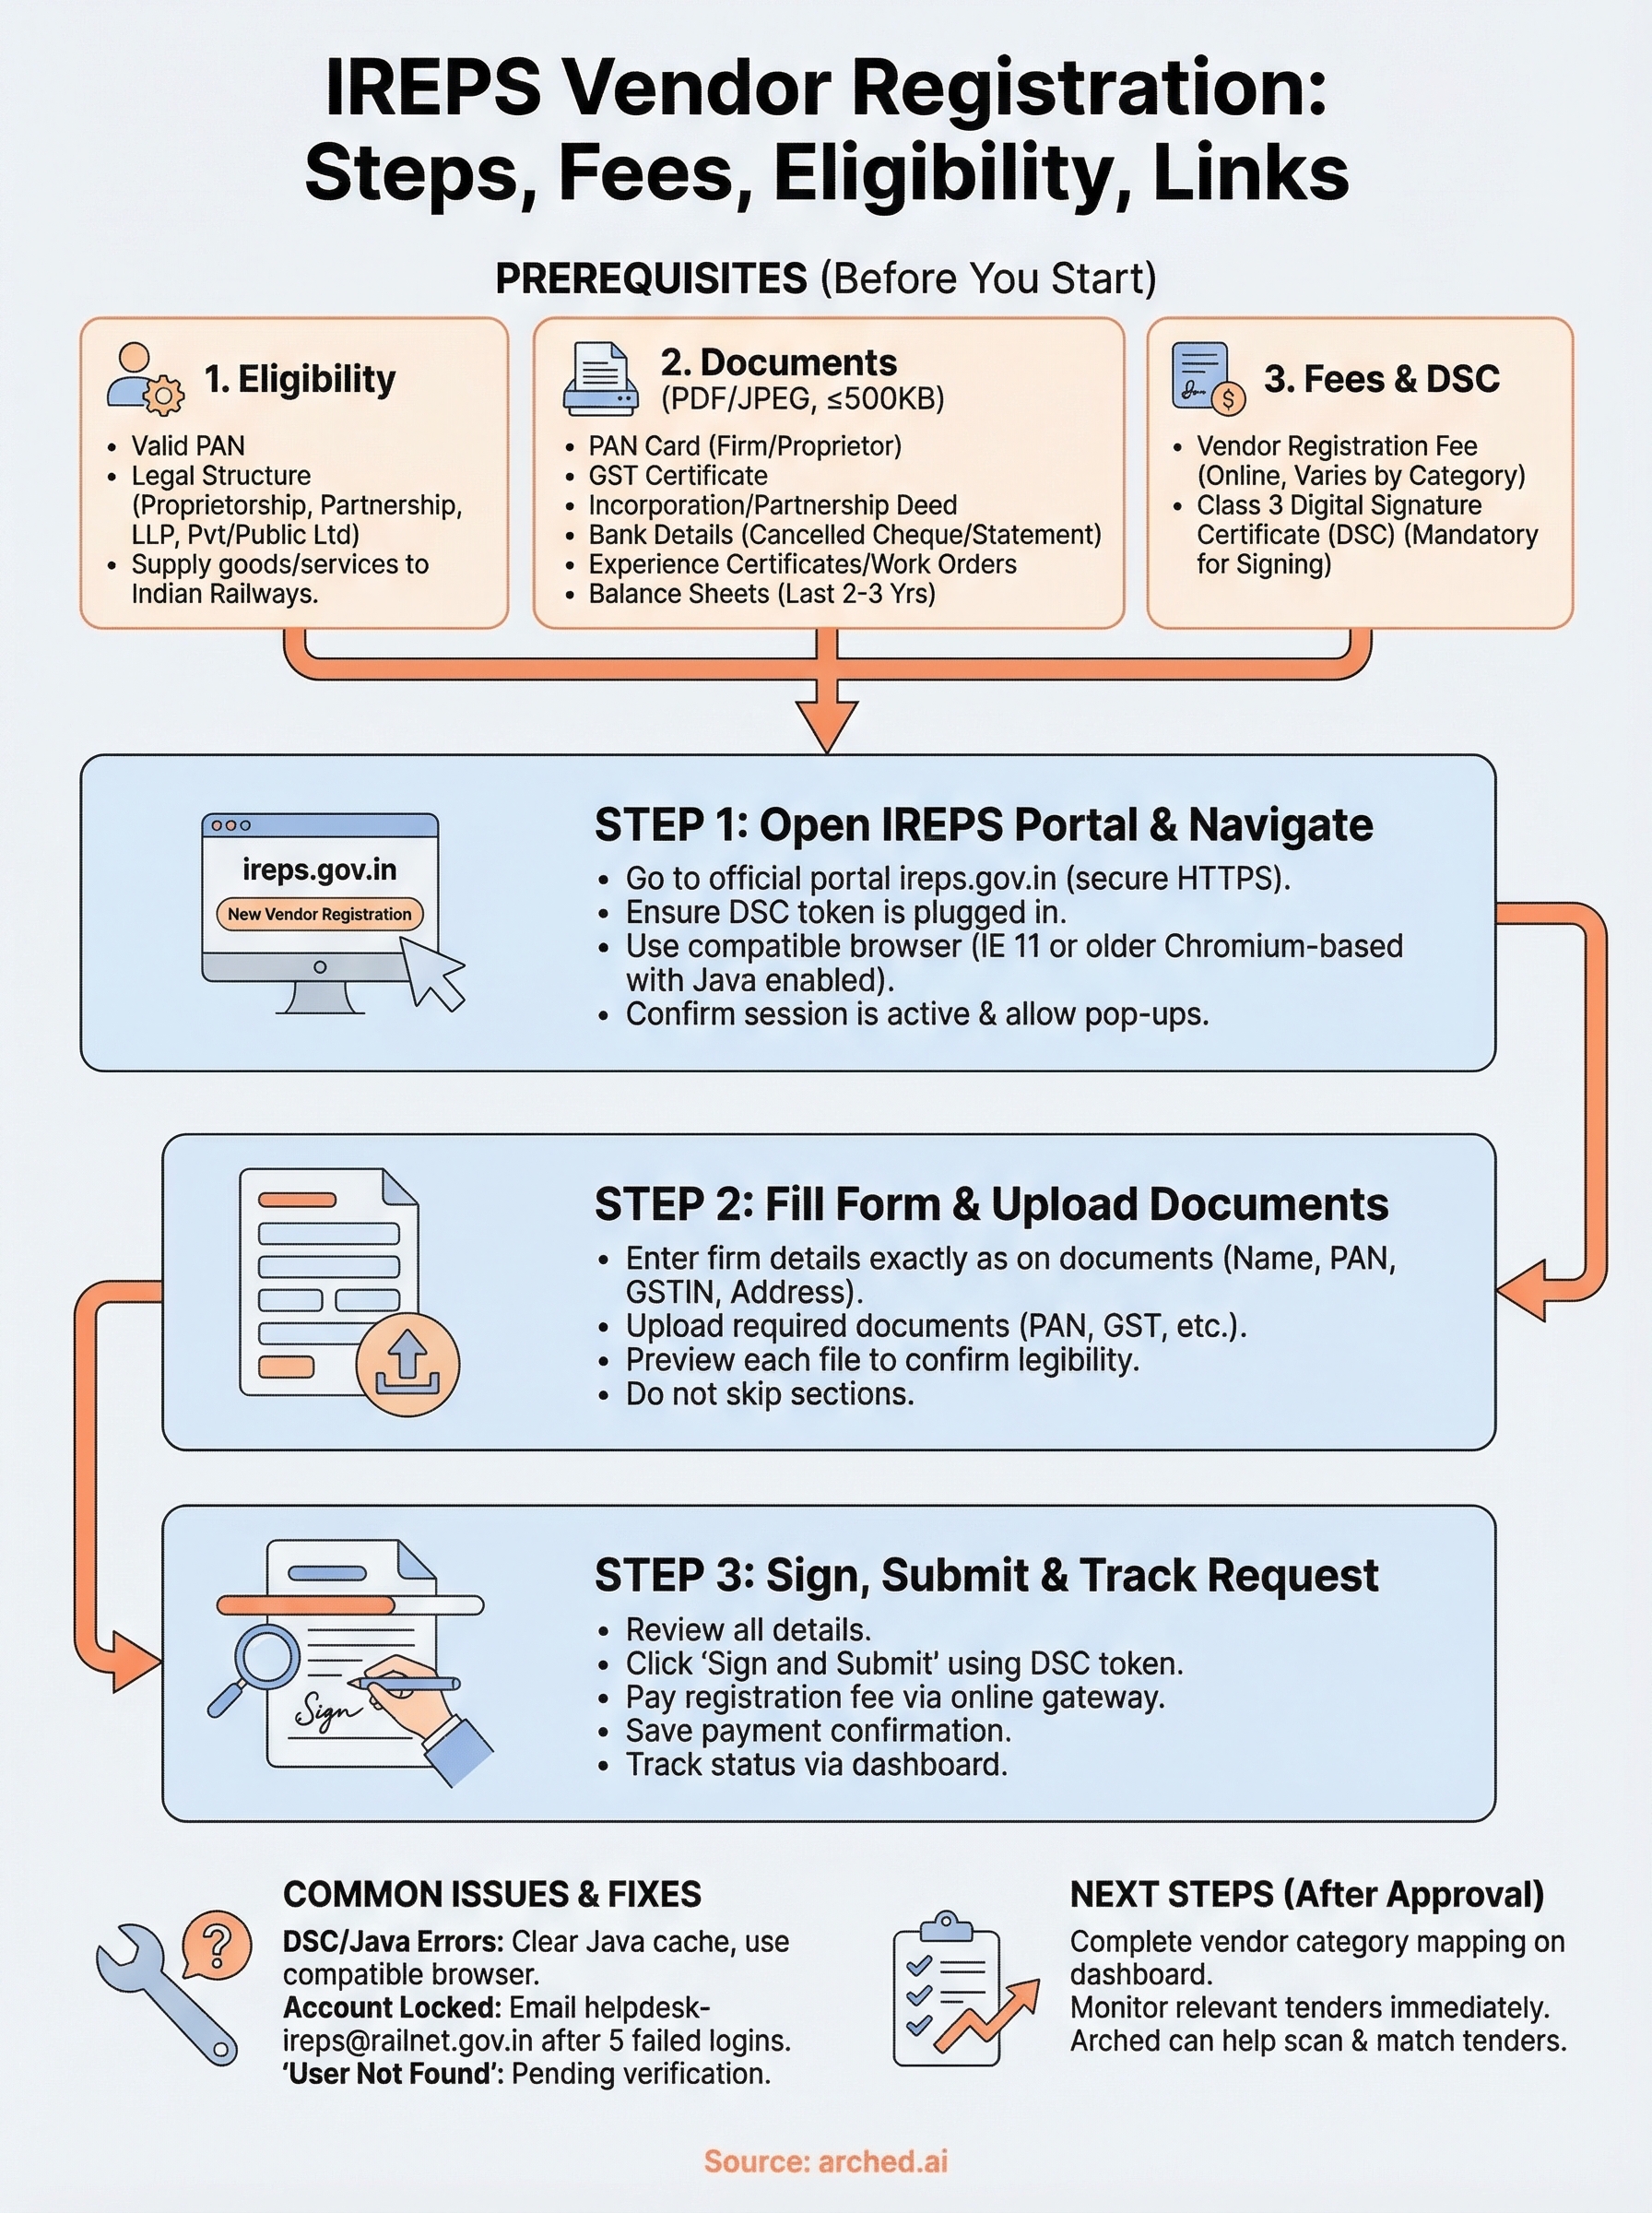
Gathering your materials before you open the IREPS portal saves you from half-completed forms and repeated logins. The IREPS vendor registration process requires you to meet specific eligibility conditions and upload verified documents in one sitting, so preparation is not optional. Knowing what to collect upfront cuts the entire process down significantly.
Eligibility criteria
IREPS is open to any Indian firm or individual that supplies goods or services to Indian Railways, but the exact eligibility depends on the vendor category you apply under. Your business must hold a valid PAN (Permanent Account Number) issued by the Income Tax Department of India, and it must be registered under a recognized legal structure, such as a proprietorship, partnership, LLP, or private or public limited company.
If your firm is incorporated outside India, you will need to follow a separate approval process under the relevant zonal railway's vendor guidelines rather than the standard online portal flow.
Documents you need to upload
IREPS requires scanned copies of specific documents, and all files must be in PDF or JPEG format and within the size limits stated on the portal. Prepare the following before you begin:

- PAN card of the firm or proprietor
- GST registration certificate (GSTIN)
- Certificate of incorporation or partnership deed, whichever applies to your business structure
- Bank account details including a cancelled cheque or a bank statement on official letterhead
- Experience certificates or work order copies relevant to your chosen vendor category
- Balance sheets for the last two or three financial years, depending on your category
Fees and Digital Signature Certificate
IREPS charges a vendor registration fee that varies by category, typically ranging from a few hundred to a few thousand rupees, and you pay it online through the portal at the time of submission. Before you can submit your application, you also need a Class 3 Digital Signature Certificate (DSC) registered in the name of your authorized signatory.
Your DSC is a legal requirement for signing and submitting documents on the portal. You can obtain one from any certifying authority licensed by the Controller of Certifying Authorities (CCA) in India, and the process typically takes two to three working days, so factor that into your timeline before you start.
Step 1. Open the right IREPS registration page
The IREPS portal has multiple sections, and landing on the wrong page wastes time. The official registration entry point for new vendors is at ireps.gov.in, the only legitimate portal managed by Indian Railways. Do not rely on third-party links or search results that may point you to outdated or unofficial pages.
Navigate to the vendor registration form
Once the homepage loads, look for the "New Vendor Registration" link in the top navigation bar or the main login panel on the right side of the screen. Clicking it opens a fresh application form that walks you through each required field in sequence. Before you proceed, make sure your DSC token is plugged into your computer, because the portal prompts you to verify it early in the process.
If the portal shows a blank screen or a Java error, switch to Internet Explorer 11 or an older Chromium-based browser with Java enabled, since IREPS still relies on Java for DSC authentication.
Confirm the session is active
After you reach the registration page, verify that your browser displays a secure HTTPS connection in the address bar. The portal times out quickly on slow connections, so keep your scanned documents open in a separate folder window before you start filling in your ireps vendor registration details to avoid losing progress mid-session.
Set your browser to allow pop-ups for the ireps.gov.in domain before you begin. The portal uses pop-up windows for DSC verification and document previews, and blocking them causes your submission to fail without a clear error message.
Step 2. Fill the form and upload documents
The registration form is divided into clearly labeled sections, and you move through them in a fixed sequence. Complete each field before advancing to the next section, as the portal does not let you skip ahead or return without losing entered data. Keep your documents open and ready so your ireps vendor registration moves forward without interruption.
Enter your firm details
This section captures your business name, PAN, GSTIN, registered address, and contact information exactly as they appear on your official documents. Any mismatch between the PAN name and your firm's legal name triggers a rejection during verification. Double-check every field against your actual certificates before moving to the next screen.
A common mistake is entering an individual's PAN instead of the firm's PAN for partnership or limited company applicants, which causes automatic rejection at the verification stage.
Upload and verify documents
Each document field accepts a single PDF or JPEG file, with most fields capping the size at 500 KB. If your scanned files exceed that limit, compress them before you begin. The portal requires you to preview each uploaded file using its built-in viewer to confirm the content is legible before it allows you to proceed to the next section.
Use this checklist as you upload:
- PAN card: firm or proprietor, whichever applies
- GST certificate: current and active registration
- Incorporation document: matching your legal structure
- Cancelled cheque: same bank account registered in the firm's name
- Work orders or experience certificates: relevant to your chosen vendor category
- Balance sheets: covering the last two to three financial years
Step 3. Sign, submit, and track your request
Once you finish uploading all required documents, the portal moves you to the final review screen, where you can see a summary of every field and file you submitted. Review it carefully before proceeding, because this is your last chance to catch errors without restarting the application.
Sign with your DSC
With your DSC token plugged in, click the "Sign and Submit" button, which triggers a Java applet that reads your certificate details and applies your digital signature to the application package. Select your authorized signatory's certificate from the pop-up window that appears, confirm the details match your application, and click "Sign."
If the signing window does not appear, clear your browser's Java cache via the Java Control Panel and reload the page before trying again.
Pay the registration fee and submit
After signing, the portal redirects you to the payment gateway where you pay your vendor registration fee using net banking, a debit card, or any UPI-enabled method. Save the payment confirmation number immediately after the transaction clears, as you will need it if you contact IREPS support about your application status.
Track your application status
Once payment is confirmed, your ireps vendor registration application receives a unique reference number displayed on-screen. Log in to the portal using your credentials and navigate to "Track Registration Status" under your account dashboard to monitor approvals, which typically take five to ten working days.
Fix common IREPS registration and login issues
Most problems with ireps vendor registration fall into a handful of repeatable patterns. Knowing what causes them and how to fix them prevents you from losing hours to support queues or restarting your application from scratch.
DSC and Java errors
The most frequent issue is a DSC that fails to load during the signing step. This usually happens because your browser's Java plugin is outdated or blocked. Open the Java Control Panel, clear the cache under the "Temporary Internet Files" section, restart your browser, and retry the signing step with your token plugged in before the page fully loads.
Always use Internet Explorer 11 or an older Chromium-based browser with Java explicitly enabled for any DSC-related action on the IREPS portal.
If the signing pop-up still does not appear, check that your DSC token driver is installed correctly. Open Device Manager on Windows and confirm the token shows up without an error flag. Reinstall the driver from your certifying authority's website if it does not.
Account locked or login failures
Your account locks after five consecutive failed login attempts. To unlock it, email the IREPS helpdesk at helpdesk-ireps@railnet.gov.in with your registered mobile number and firm PAN. Response times typically run one to two working days.
If you receive a "User not found" error despite completing registration, your verification is still pending. Log in and check your registration status under the dashboard before contacting support.
Next steps after you register
Your ireps vendor registration approval is the starting point, not the finish line. Once your profile is active, go to your account dashboard and complete your vendor category mapping so that Indian Railways procurement officers can find your firm when sourcing for specific goods or services. Missing this step means your profile exists but stays invisible to buyers.
From there, start monitoring relevant tenders immediately. IREPS lists hundreds of active opportunities across zones at any given time, and the earliest bidders tend to have more time to prepare strong technical and financial submissions, which directly affects win rates.
Manually tracking IREPS plus the hundreds of other government portals your competitors are watching is where most BD teams lose ground. Arched scans IREPS and 500+ procurement portals simultaneously, matches tenders to your actual credentials, and alerts you before deadlines close. Set up your profile and stop missing contracts that were already within your reach.