Fusion 360 Generative Design: Setup, Pricing, And Workflow
Master Fusion 360 generative design. Learn the setup, pricing, and workflow to create optimized CAD models that balance weight, strength, and cost.
Fusion 360 Generative Design: Setup, Pricing, And Workflow
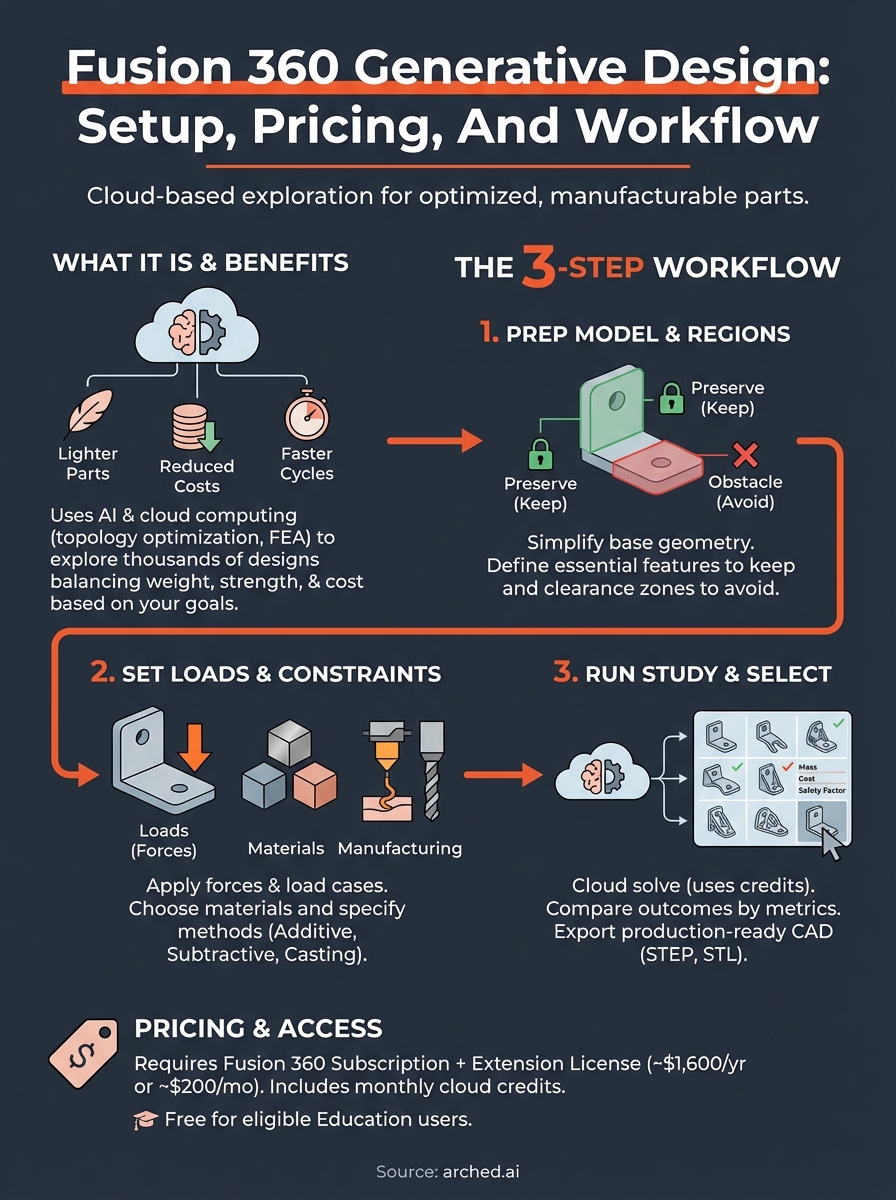
Autodesk's Fusion 360 generative design extension lets engineers define constraints and goals, then relies on cloud computing to generate hundreds of manufacturable options automatically. Instead of manually iterating through a handful of concepts, the software explores design spaces that would take humans weeks to cover. For product designers and manufacturers, this means lighter parts, reduced material costs, and faster development cycles.
At Arched, we apply similar generative principles to bridge engineering, running thousands of physics-driven simulations to find optimal structures. So we understand both the power and the practical considerations of adopting this technology. The setup process, licensing costs, and workflow nuances matter just as much as the algorithm itself.
This guide walks you through how Fusion 360's generative design works, what it costs, and how to configure your first study. You'll leave with a clear roadmap to start generating optimized designs in your own projects.
What Fusion 360 generative design does
You feed the tool a starting geometry, structural requirements, and manufacturing method, then the cloud-based engine explores thousands of shape variations that meet your criteria. The algorithm iteratively removes material from non-critical zones while maintaining structural integrity according to the loads and constraints you define. Each outcome balances weight, strength, and cost based on the objectives you prioritize.
Core algorithm and process
Fusion 360 generative design relies on topology optimization and lattice structures to find efficient material distribution. You start by specifying preserve regions (areas that must stay untouched, like mounting holes) and obstacle regions (zones the software must avoid, such as clearance for other components). The system then runs finite element analysis (FEA) on every iteration, checking stress concentrations and deflection against your safety factors.
The platform uses machine learning to accelerate convergence, learning which geometric patterns satisfy your constraints faster than brute-force simulation. If you specify that a bracket must support 500 pounds with a safety factor of 2.0 while weighing less than 0.5 pounds, the algorithm discards non-compliant shapes early and focuses computational resources on promising candidates. Each study can generate dozens to hundreds of design options depending on how many manufacturing methods and materials you enable.
The software doesn't just lighten parts randomly. It identifies the exact load paths through your geometry and allocates material only where structural performance demands it.
Output types and manufacturing constraints
You get production-ready CAD models that export directly to your preferred manufacturing workflow. The extension supports additive manufacturing (3D printing), subtractive methods (CNC milling), and casting processes. When you select additive manufacturing, the tool incorporates support structure requirements and build orientation constraints automatically. For CNC milling, it respects tool access angles and generates shapes that avoid undercuts.
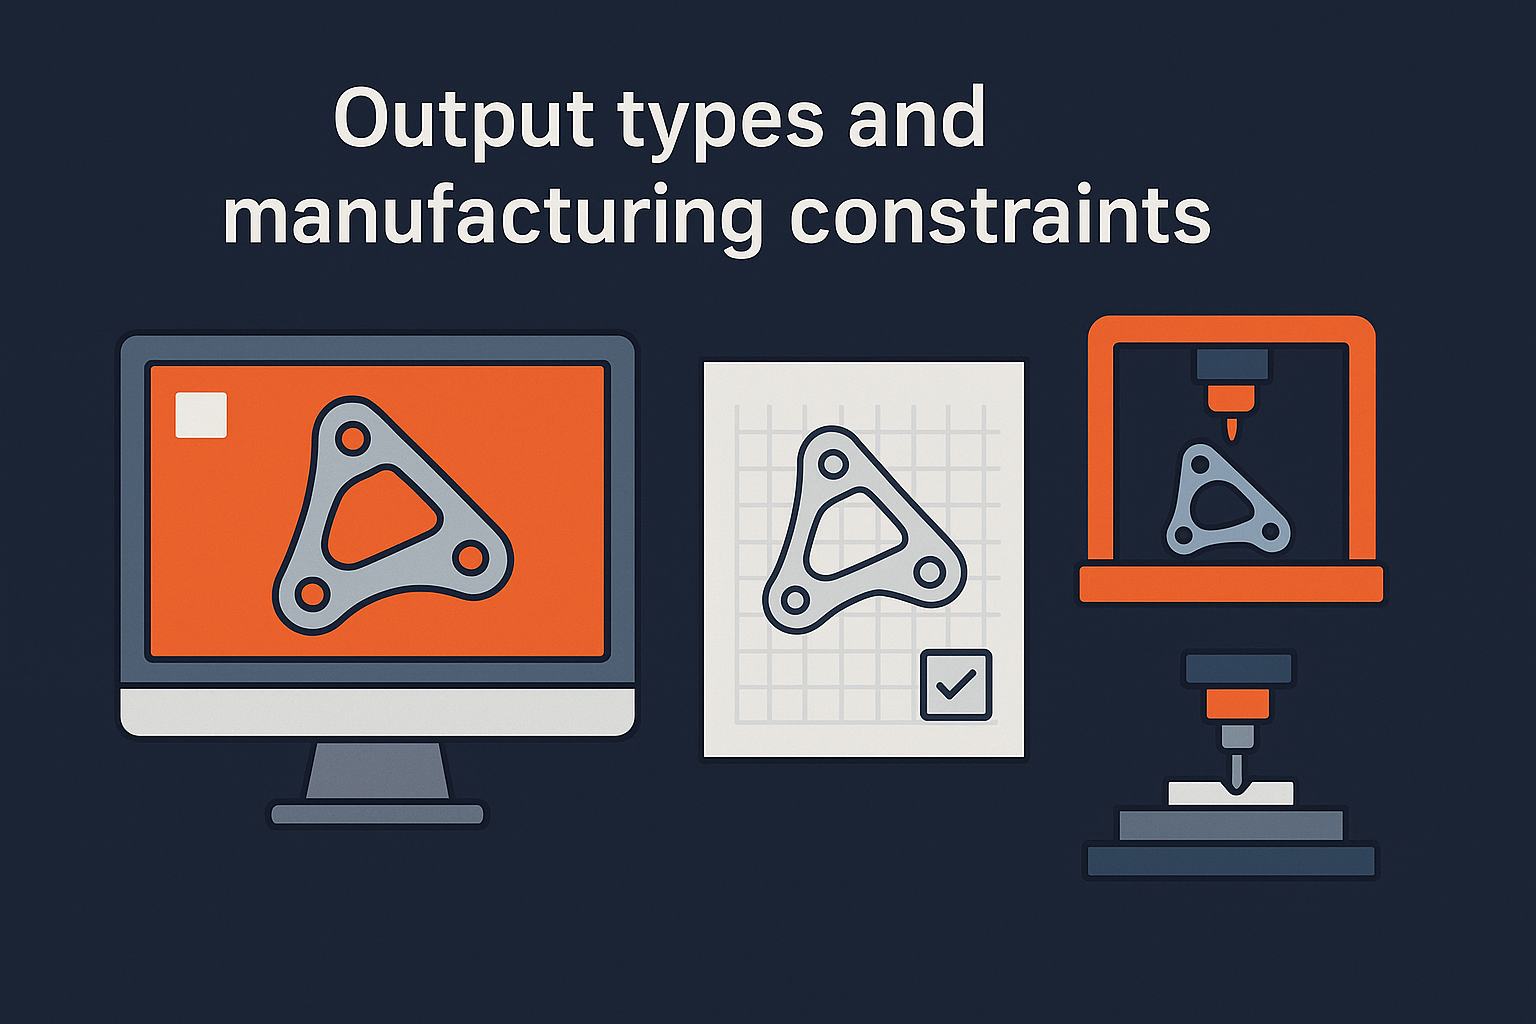
Fusion 360 generative design also produces comparison charts that plot each outcome's mass, cost, and factor of safety. You filter results by clicking specific manufacturing methods or adjusting material choices in real time. The platform includes metals, polymers, and composites in its material library, calculating realistic costs based on current material densities and fabrication complexity. After you select a preferred design, you export it as a STEP file, STL, or native Fusion format for downstream detailing and drawing production.
Pricing and access options
You access fusion 360 generative design through an extension license that sits on top of your base Fusion 360 subscription. Autodesk does not sell the generative design module as a standalone product. You must hold an active Fusion 360 subscription before you can purchase or trial the extension.
Subscription tiers
The generative design extension costs $1,600 per year when billed annually, or approximately $200 per month on a month-to-month plan. Autodesk offers a 30-day free trial that gives you full access to cloud solve credits and all manufacturing method options. Your base Fusion 360 subscription runs around $545 per year for commercial use, so the total annual cost lands near $2,145 for complete generative design capability.
Educational institutions and students receive free access to both Fusion 360 and the generative design extension through Autodesk's education program. You verify your academic status through the Education Community portal, then download the full suite at no cost. This license remains active as long as you maintain eligible student or faculty status.
The cloud credits included with your extension license determine how many design studies you can run simultaneously, so factor in your project volume when choosing between monthly and annual billing.
What's included with access
Your subscription provides unlimited local preprocessing for setting up studies, defining preserve regions, and configuring constraints. The extension includes 200 cloud credits per month for running generative solves on Autodesk's servers. Each design study consumes credits based on complexity, with simple brackets using 10 to 20 credits and intricate assemblies requiring 50 or more. You purchase additional credit packs in increments of 100 for $100 if you exceed your monthly allocation.
Step 1. Prep the model and regions
You start by loading your base CAD model into Fusion 360 and identifying which portions must remain unchanged versus which areas the algorithm can modify. This preparation determines how effectively the software explores the design space, so you spend time here defining preserve regions (features that must stay intact) and obstacle regions (zones the generative shapes cannot occupy). The cleaner your initial setup, the faster your studies converge on manufacturable solutions.
Simplify your starting geometry
Your base model should contain only the essential structural elements and mounting features that define your design intent. Remove unnecessary details like chamfers, fillets, and cosmetic features that will distract the algorithm from exploring load-bearing geometry. If you're optimizing a mounting bracket, keep the bolt holes, attachment surfaces, and overall envelope, but strip out decorative elements or non-structural ribs.
Fusion 360 generative design runs faster when you feed it a minimal starting body rather than a fully detailed part file with hundreds of small features.
Open your design in the Design workspace, then switch to the Generative Design workspace from the workspace selector. Click Create Study and select your target body. The interface prompts you to verify units and model scale before proceeding.
Mark preserve and obstacle zones
Select faces or bodies that must remain geometrically untouched during optimization, such as mounting holes, mating surfaces, or areas requiring specific dimensions for assembly. Right-click these features and choose Preserve Geometry from the context menu. The software highlights these regions in a distinct color to confirm your selection.
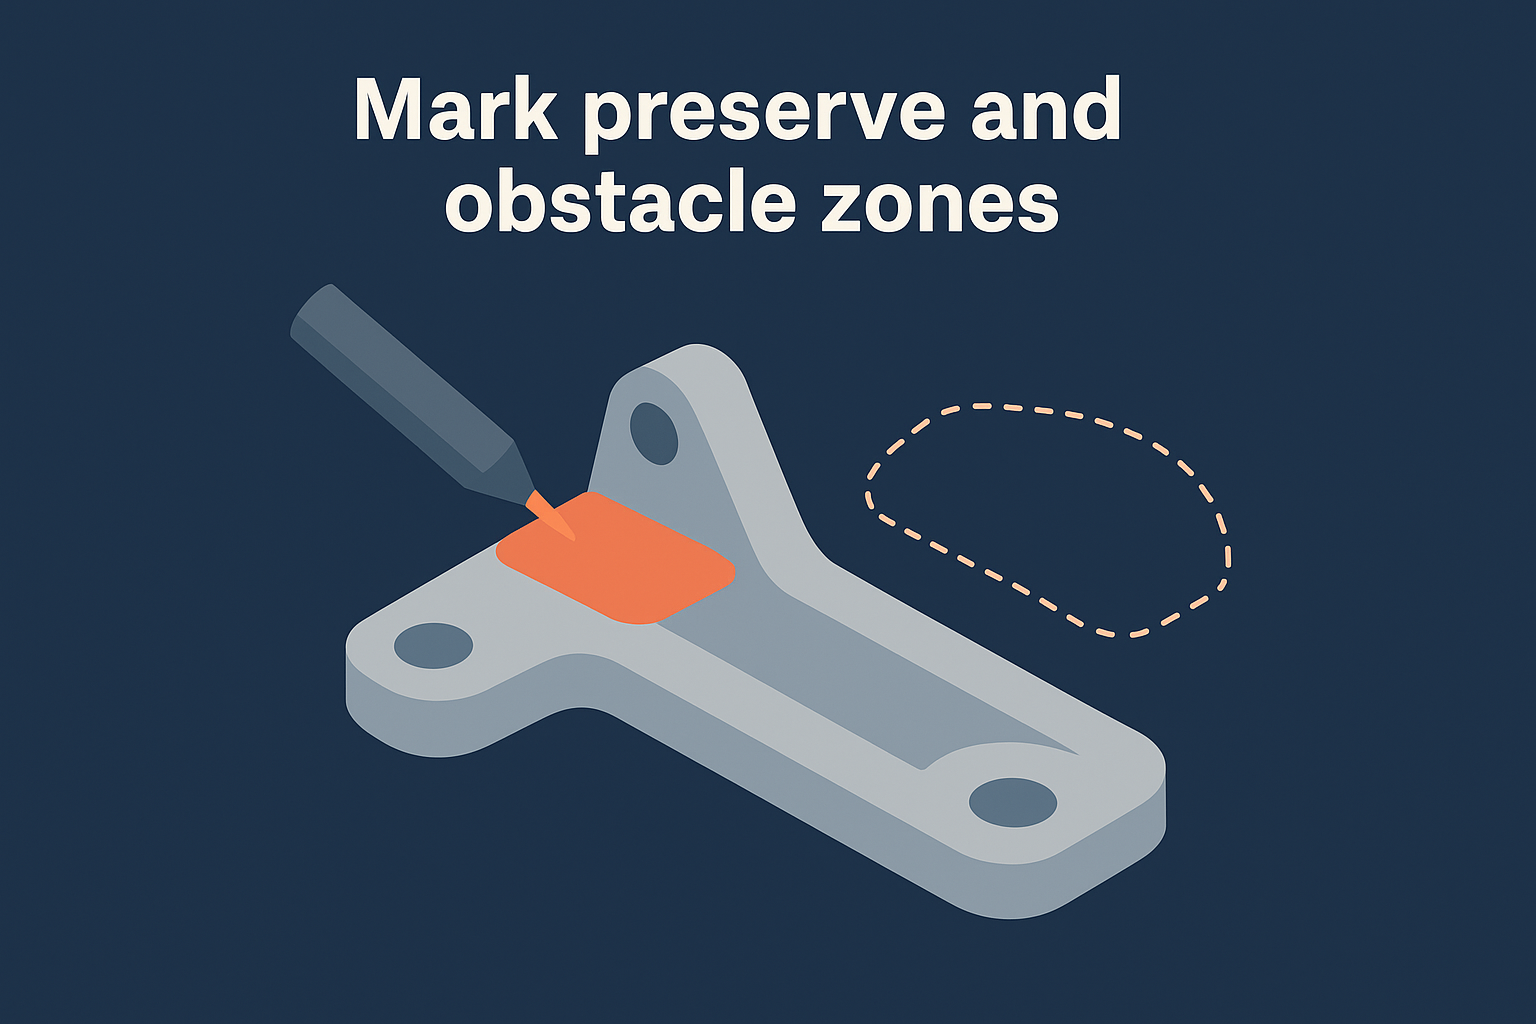
Next, identify any clearance zones where generated material would interfere with adjacent components or assembly tools. Use the Obstacle Geometry command to block these volumes. If your bracket mounts near a motor housing, you define that housing's envelope as an obstacle so the algorithm avoids generating shapes that collide with it.
Step 2. Set loads, materials, and constraints
After you define preserve and obstacle regions, you configure the physical forces your part must withstand and the material properties that govern structural performance. Fusion 360 generative design uses these inputs to calculate stress distribution and eliminate unnecessary material while maintaining your required safety margins. You apply loads to specific faces, choose from a library of engineering materials, and set boundary conditions that lock portions of your geometry in place.
Define structural loads
Click Structural Loads in the setup panel and select the face or edge where force applies. Enter the magnitude in pounds or newtons and specify the direction vector using either coordinate axes or a reference geometry. For a mounting bracket supporting a 500-pound motor, you apply a 500 lb downward force to the mounting surface where the motor attaches.
You add multiple load cases if your part experiences different force combinations during operation. A suspension component might need one load case for vertical impact and another for lateral cornering forces. Each load case runs as a separate evaluation within the same study.
The software tests every generated shape against your defined loads to ensure structural integrity before presenting results.
Choose materials and manufacturing methods
Select Material from the setup toolbar and pick from metals, polymers, or composites in the library. Common options include aluminum 6061, steel alloys, and ABS plastic, each with predefined density, yield strength, and elastic modulus values. The algorithm factors material cost and weight into its optimization scoring automatically.
Under Manufacturing, check the boxes for additive, subtractive, or casting processes. If you enable multiple methods, fusion 360 generative design produces separate design families optimized for each fabrication approach. Additive designs incorporate internal lattices, while subtractive outputs respect tool access requirements.
Step 3. Run studies and review results
You initiate the cloud-based computation after verifying your loads, constraints, and material selections. Fusion 360 generative design sends your study parameters to Autodesk's servers, where parallel processing evaluates thousands of geometric variations simultaneously. This step consumes cloud credits from your subscription, with complex studies requiring more credits than simple brackets or mounting fixtures. The software emails you when results finish processing, typically within 30 minutes to several hours depending on study complexity.
Launch the cloud solve
Click Generate in the study setup panel to queue your job. The interface displays a credit estimate before you commit, showing exactly how many credits the study will consume based on your selected manufacturing methods and outcome count. Confirm the solve to push your model to the cloud.
Monitor progress through the Study Status dashboard, which updates in real time as the algorithm completes iterations. You see a running count of generated designs and can cancel the solve early if you notice incorrect constraints or loads applied during setup.
The cloud solvers run finite element analysis on every candidate shape, eliminating options that violate your safety factors before presenting results.
Compare and select outcomes
Review the outcome gallery once processing completes. Each thumbnail shows a unique design variant with its mass, factor of safety, and estimated manufacturing cost listed below. Sort results by weight, cost, or structural efficiency using the filter controls at the top of the gallery.
Click any design to inspect detailed stress plots and deflection maps. Compare multiple candidates side by side using the comparison view, which overlays their performance metrics in a single table for faster decision-making.
Next steps
You now have the complete workflow for fusion 360 generative design, from initial model preparation through cloud-based optimization to final design selection. Start with a simple mounting bracket or structural support rather than a complex assembly for your first study. This approach helps you learn the interface constraints without burning through cloud credits on failed attempts.
Download your selected design as a STEP file and refine small details like corner radii and surface finishes in the standard Fusion 360 modeling environment. Export manufacturing drawings with dimensions and tolerances for your fabrication partner. Track the weight reduction and cost savings compared to your original design to quantify the value for future projects.
If you work in infrastructure rather than product design, explore how Arched applies generative engineering to bridge optimization. We run similar physics-driven simulations across thousands of structural variations, helping engineers find configurations that balance safety, cost, and carbon impact.